Saturday, July 14, 2012

Cinnamon Bread

I thought it would be fun to make some simple cinnamon bread for the kids. Kind of like monkey bread.  Nothing fancy or too difficult. 
Rhodes frozen rolls + butter + cinnamon sugar + bunt cake pan

Bake for 15 minutes at 350˙

I sprayed the pan with Pam.  Tossed my frozen roll dough in and swirled them around a bit to coat them. Set on the counter to thaw and rise.  Poured 1/4 cup of melted butter around and around the top of risen rolls.  Sprinkled the tops with lots of cinnamon sugar.  Then a little more cinnamon sugar.

I ate one and couldn't stop.  Davis had one and Mike had one.  The rest went into my belly. What is the deal with warm carbs and a little butter? It's irresistible.  
The bright side: These are so easy to make.
The dark side: These are so easy to make.

http://www.thesaltypineapple.com

Homemade Butterfingers

Homemade Butterfingers


I don't eat a lot of candy, but I l♥ve Butterfingers.  When I saw this recipe on the Taste of Home forums, I knew I had to give it a try.  Everyone on the board said it tasted just like a real Butterfinger.  The best part - this recipe only has three ingredients! 

How can you make a Butterfinger with only three ingredients?? Well, the secret ingredient is candy corn!  Actually, it is melted candy corn.  I would have never thought to melt candy corn, but it turns out that melted candy corn mixed with peanut butter transforms into something amazing!  We were shocked at how great these tasted and how close they are to real Butterfingers.  I had to give most of these away so we didn't eat them all by ourselves.

This is one of the best homemade candies that I have ever made.  I think these would be cute made into suckers for the holidays.  I am going to look for some Christmas tree candy molds and give it a try.

This is a great way to use up any candy corn you have leftover from Halloween.  So get to it! 


Candy Corn Butterfingers
Taste of Home forums
(Printable Recipe)

1 lb. candy corn
16oz jar peanut butter (I used Peter Pan Honey Roasted peanut butter)
16oz pkg. chocolate candy coating

Melt candy corn in microwave on high 1 minute. Stir and continue cooking in 15-second intervals til melted, stirring after each interval. Stir in peanut butter. Spread mixture in an 8x8 pan lined with parchment. Cool completely. Cut into squares. Dip in melted chocolate candy coating. Lay on waxed paper to set.


http://www.plainchicken.com

Cinnamon Roll Pancakes

Cinnamon Roll Pancakes


If you’ve ever thought you needed a reason to eat pancakes, today is the day:  National Pancake Day.  Eat a short stack for breakfast, enjoy them for lunch, or make a dinner out a manhole-sized pancake… guilt free… because you’re merely celebrating their existence.  How do you like your pancakes? Buttermilk? Sweet Potato? Whole Grain? Fruit topped? Whipped Cream? I don’t usually care for any of that fancy stuff, but I can tell with absolute certainty that over-cooked, crusty pancakes have no place in my world. I like my pancakes fluffy. And sometimes I like slices of banana cooked inside. A good dose of real maple syrup is what I prefer to drizzle on top. But recently I started dreaming about mixing cinnamon rolls and pancakes together… and this is what I came up with- my new favorite pancake: Cinnamon Roll Pancakes.  Here are some tips for how to be successful with these!

I have a wonderfully fluffy pancake batter that I like to use (recipe below) so I swirled a bit of cinnamon roll filling into the pancake.

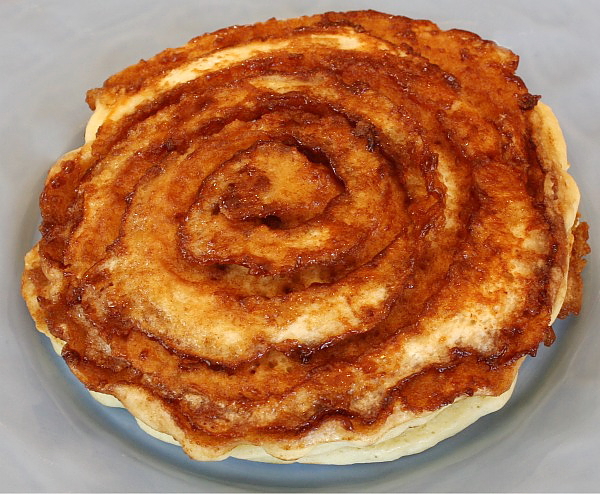
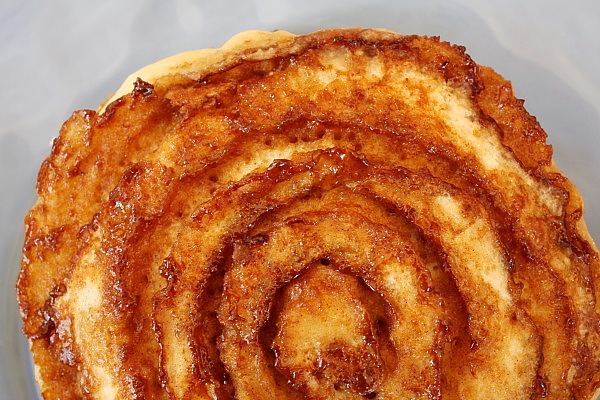
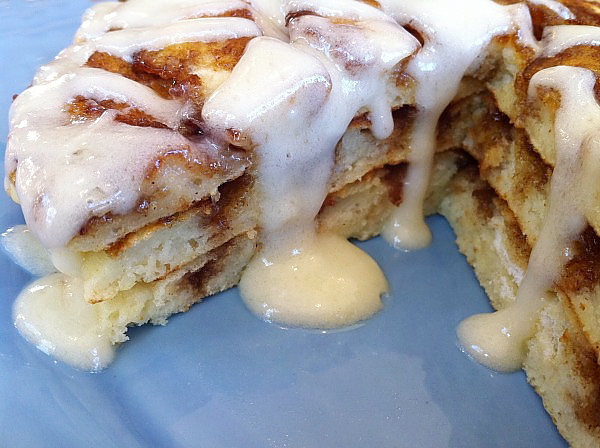
And they cooked up just like a pancake- fluffy, but with craters of crusty, sugary cinnamon swirled within.

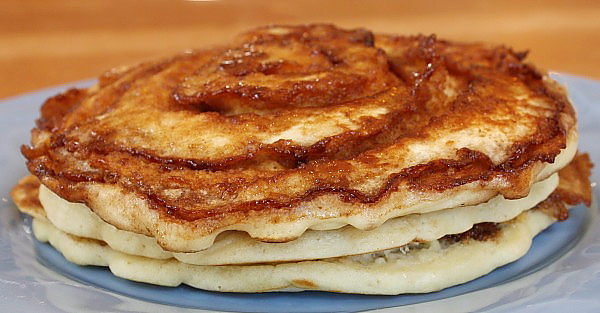
You might find three of these stacked in a fancy breakfast restaurant, but I’m gonna tell you that one pancake is all you need. It’s like eating a cinnamon roll, and no one needs more than one cinnamon roll for breakfast. Or certainly no more than two ;)

See, just like a cinnamon roll. Love this. I can eat this pancake just as you see it, but you really need to add the glaze to get the full cinnamon roll-effect. Read on…

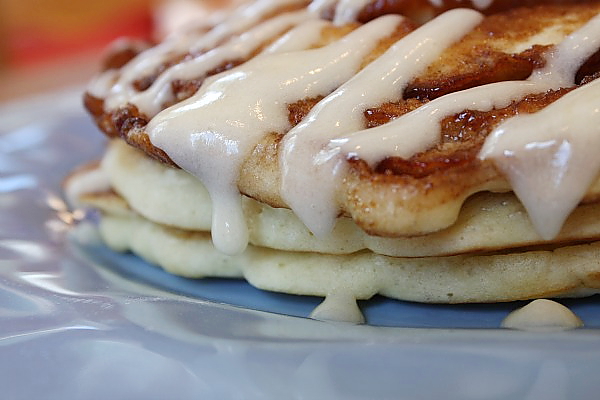
Oh yeah. A warmed cream cheese glaze drizzled on top really completes this pancake. No syrup needed. Let me say that again: No. Syrup. Needed.


There you have it: Cinnamon Roll Pancakes. With lots of ooey, gooey cream cheese glaze drizzled on top. Do yourself a favor and treat yourself to a pancake today. Go get ‘em. These babies are just like eating a cinnamon roll, which is a perfectly okay… once in a while, right?  I mean,  it’s not like I put chocolate chip cookie dough in them or anything.  Hmmmm.

Cinnamon Roll Pancakes

Yield: Eight 4-inch pancakes
Prep Time: 25 min
Cook Time: 10 min
An absolutely decadent morning treat...
*NOTE: This recipe has been revised (2/18/12) from its original publication. I've tried the current version many times with great success. Just follow all the tips and you'll get it right!

Ingredients:

CINNAMON FILLING:
4 tablespoons (1/2 stick) unsalted butter, just melted (not boiling)
1/4 cup + 2 tablespoons packed light brown sugar
1/2 tablespoon ground cinnamon
CREAM CHEESE GLAZE:
4 tablespoons (1/2 stick) unsalted butter
2-ounces cream cheese, at room temperature
3/4 cup powdered sugar
1/2 teaspoon vanilla extract
PANCAKES:
1 cup all-purpose flour
2 teaspoons baking powder
1/2 teaspoon salt
1 cup milk
1 large egg, lightly beaten
1 tablespoon canola or vegetable oil

Directions:

Prepare the cinnamon filling: In a medium bowl, stir together the butter, brown sugar and cinnamon. Scoop the filling into a quart-sized heavy zip baggie and set it aside (see *Tips below).
Prepare the glaze: In a small pan, heat the butter over low heat until melted. Turn off the heat and whisk in the cream cheese until it is almost smooth. Sift the powdered sugar into the pan, stir and add in vanilla extract. Set the pan aside while you make the pancakes.
Prepare the pancake batter: In a medium bowl, whisk together the flour, baking powder and salt. Whisk in the milk, egg and oil, just until the batter is moistened (a few small lumps are fine).
Cook the pancakes: Heat a large, nonstick skillet over medium-heat and spray with nonstick spray. Use an ice cream scoop (or 1/3 cup measuring cup) to add the batter to the pan. Use the bottom of the scoop or cup to spread the batter into a circle (about 4-inches in diameter). Reduce the heat to medium low. Snip the corner of your baggie of cinnamon filling and squeeze the filling into the open corner. When your pancake begins to form bubbles, add the filling. Starting at the center of the pancake, squeeze the filling on top of the pancake batter in a swirl (just as you see in a regular cinnamon roll). Cook the pancake 2 to 3 minutes, or until the bubbles begin popping on top of the pancake and it's golden brown on the bottom. Slide a thin, wide metal spatula underneath the pancake and gently but quickly flip it over. Cook an additional 2 to 3 minutes, until the other side is golden as well. When you flip the pancake onto a plate, you will see that the cinnamon filling has created a crater-swirl of cinnamon. Wipe out the pan with a paper towel, and repeat with the remaining pancake batter and cinnamon filling. Re-warm the glaze briefly, if needed. Serve pancakes topped with a drizzle of glaze.

Tips:

*Quick and easy tip: Use a boxed pancake mix as the base for this recipe.
*Tips for the cinnamon filling: Before swirling, open up the baggie again and give it a good stir to re-incorporate any butter that may have separated from the sugar. You want the mixture to thicken a bit- it's best when it's similar to the squeezing texture of a tube of toothpaste, which will happen if you leave it at room temperature for several minutes. Don't try to use the filling for the pancake swirl unless it has thickened as it will be too runny to make a solid swirl.
*Keep the heat low or your pancakes might cook up too quickly. Don't flip them until you see those bubbles starting to pop on top. Flip them with a wide spatula so you can grasp the whole thing without batter and filling dripping all over the place!
*I wrote a very detailed post on how to get the cinnamon filling *just right* on my Gingerbread- Cinnamon Roll Pancakes Post. Check it out before you attempt these!
*If you're trying to justify your intake of decadent cinnamon rolls, you can make this a tad bit healthier by using half whole-wheat flour and low fat cream cheese, or enjoy the pancakes without glaze.


http://www.recipegirl.com

Marshmallow Frosting

Marshmallow Frosting

I’ve been following The Creative Chick Parade over at The Girl Creative and am so enjoying all the various crafts being shared.
How it works is, you merely link up a craft you’ve created and posted about on your blog. It can be an old post or a new one, it doesn’t matter. You just have to link up to the theme for the day.
Well, today’s theme is recipes and I recently stumbled across a really yummy frosting for cakes. It works especially well on cupcakes. If you pipe it on, it stands up beautifully – much like soft serve ice-cream! And the taste… well it tastes just like gooey soft marshmallow fluff! {In South Africa we get Cadbury’s “Sweetie Pies” chocolates with this marshmallow goo inside – and this frosting tastes just like it!}.
005
4 large egg whites
1 Cup ordinary sugar (white or brown)
1 pinch of salt
1 tsp vanilla essence
Place all ingredients except the vanilla essence into a bowl which you can place over a pot of simmering water.
{You could use a double boiler here instead}
Whisk the egg white mixture constantly over simmering water until the sugar dissolves and the mixture is hot to the touch. {It takes around 5 minutes}.
Pour the mixture into a bigger bowl and beat with an electric mixer for 3 minutes. {Add the vanilla while beating}. After 3 minutes, the mixture will be lovely and fluffy.
{I used my Kenwood food mixer}
I love using disposable piping bags – {or you could even use a plastic bag} without a nozzle, I simply piped straight out the end of the piping bag directly onto the cupcakes.
Don’t you love how they look – and so yummy!!!
Hope you try this recipe. It sounds like a bit of work, but really it takes very little time and effort and they are so easy to pipe as the icing is very soft and much easier to squirt out than buttercream.


http://veronicahurly.blogspot.ca/2010/09/marshmallow-frosting.html

Friday, July 13, 2012

How to Clean Your Car Headlights


How to Clean Your Car Headlights


Things You'll Need

  • Car
  • Toothpaste

Instructions

    • 1
      The first step is to apply some toothpaste on a dry cloth.
    • 2
      Once the toothpaste is on the cloth, begin to rub the headlight cover with it until the grime comes off.
    • 3
      Keep rubbing the toothpaste in circular motions until the grime breaks down all the way. After that proceed to rinse with water and wipe down with a wet cloth.

Tips tips tips

http://d24w6bsrhbeh9d.cloudfront.net/photo/1731725_700b.jpg

The Benefits of Hydrogen Peroxide and its Many Uses

Dr Akilah El – Celestial Healing Wellness Center

The Natural Health and Holistic World According to Dr Akilah El

The Benefits of Hydrogen Peroxide and its Many Uses


by Andrea Harper
Hydrogen peroxide is the only germicidal agent composed only of water and oxygen. Like ozone, it kills disease organisms by oxidation! Hydrogen peroxide is considered the worlds safest all natural effective sanitizer. It kills microorganisms by oxidizing them, which can be best described as a controlled burning process. When hydrogen peroxide reacts with organic material it breaks down into oxygen and water.
Whiten Clothes – An Alternative to Beach
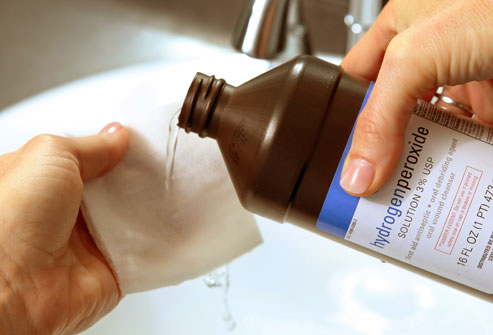
Add a cup of Peroxide to white clothes in your laundry to whiten them. Peroxide is great to get rid of blood stains on clothes and carpets. If there is blood on clothing, just pour directly on the spot, let it sit for about a minute, then rub and rinse with cold water. Repeat if necessary.
Health:
Your body makes hydrogen peroxide to fight infection which must be present for our immune system to function correctly. White blood cells are known as Leukocytes. A sub-class of Leukocytes called Neutrophils produce hydrogen peroxide as the first line of defense against toxins, parasites, bacteria, viruses and yeast.
Rejuvenating Detoxifying Bath:
Use about 2 quarts 3% hydrogen peroxide to a tub of warm water. Soak at least 1/2 hour, adding hot water as needed to maintain a comfortable water temperature.
Foot Fungus:
To cure a foot fungus, simply spray a 50/50 mixture of hydrogen peroxide and water on them (especially the toes) every night and let dry.
Douche:
Add 2 capfuls of 3% hydrogen peroxide in warm distilled water once to twice a week to remove even chronic yeast infections.
Colonic or Enema:
For a colonic, add 1 cup (8 ozs.) 3% H202 to 5 gallons warm water. (Do not exceed this amount) For an enema, add 1 tablespoon of 3% H202 to a quart of warm distilled water.
Infections:
Soak any infections or cuts in 3% for five to ten minutes several times a day. Even gangrene that would not heal with any medicine has been healed by soaking in hydrogen peroxide. Put half a bottle of hydrogen peroxide in your bath to help rid boils, fungus or other skin infections.
Bird Mites Infections:
Patients infected by tiny mites report that hydrogen peroxide effectively kills the mites on their skins. They spray it on their skin a couple of times (with a few minutes in between the applications) with amazing results.
Sinus Infections:
A tablespoon of 3% hydrogen peroxide added to 1 cup of non-chlorinated water can be used as a nasal spray. Depending on the degree of sinus involvement, one will have to adjust the amount of peroxide used.
Wound Care:
3% H2O2 is used medically for cleaning wounds, removing dead tissue, and as an oral debriding agent. Peroxide stops slow (small vessel) wound bleeding/oozing, as well.
Some sources recommend soaking infections or cuts for five to ten minutes several times a day. However, washing and rinsing action is sufficient. You shouldn’t leave the solution on open tissue for extended periods of time as, like many oxidative antiseptics, hydrogen perioxide causes mild damage to tissue in open wounds. Therefore it is important to use with caution.

Personal Care:

Mouthwash / Tooth Care:
Healing Properties: Take one capful (the little white cap that comes with the bottle) and hold in your mouth for 10 minutes daily, then spit it out. You will not have canker sores and your teeth will be whiter. If you have a terrible toothache and cannot get to a dentist right away, put a capful of 3% hydrogen peroxide into your mouth and hold it for 10 minutes several times a day. The pain will lessen greatly.
Mouthwash: Many people don’t realize that hydrogen peroxide makes a very effective and inexpensive mouthwash. Use 3% H202 – add a dash of liquid chlorophyll for flavoring if desired.
Toothpaste: Use baking soda and add enough 3% H202 to make a paste. Or, just dip your brush in 3% H202 and brush. Soak your toothbrush in hydrogen peroxide to keep them free of germs.
Toothbrush: Soaking your toothbrush in hydrogen peroxide will help keep them free of harmul germs.
Tooth Ache: Hydrogen peroxide is not a pain killer; however, as an anti-viral, antibacterial and anti-fungal agent, it is effective at treating the pathogen that is causing the infection. The following is from my own personal experience: My dentist wanted to give me a root canal some time ago as one tooth was inflamed and, in her opinion, would die. I felt some discomfort but told her that I would give it chance to heal. I rinsed with hydrogen peroxide (several times a day) as well ascoconut oil (once a day). The discomfort went away and I have had no further problems with the tooth.
Tooth Whitening: Having used 3% Hydrogen Peroxide as a mouth wash for sometime ago, I am thrilled to note that my teeth have been beautifully and effortlessly whitened. I used to pay so much for professional whitening, those silly strips and uncomfortable trays. Live and learn.
NOTE: Do not swallow any peroxide. When the peroxide rinse is done, be sure to rinse out your mouth with water.
Colonic or Enema:
For a colonic, add 1 cup (8 ozs.) 3% H202 to 5 gallons warm water. (Do not exceed this amount) For an enema, add 1 tablespoon of 3% H202 to a quart of warm distilled water.
Hair Lightening:
Peroxide is a bleaching agent and is used for lightened hair. Dilute 3% hydrogen peroxide with water (50 / 50) and spray the solution on your wet hair after a shower and comb it through. You will not have the peroxide burnt blonde hair like the hair dye packages, but more natural highlights if your hair is a light brown, faddish, or dirty blonde. It also lightens gradually so it’s not a drastic change.
Contact Lenses:
Hydrogen peroxide is used as a disinfectant in CIBA Vision’s Clear Care no rub contact lens cleaning solution, due to its ability to break down the proteins that build up on the lense from the eye’s immune response, resulting in increased comfort for those with sensitive eyes.

Sanitizing / Disinfectant / Cleaning

Straight or Diluted Hydrogen Perioxide:
Clean your counters and table tops with hydrogen peroxide to kill germs and leave a fresh smell. Simply put a little on your dishrag when you wipe, or spray it on the counters. Use hydrogen peroxide to clean glass and mirrors with no smearing.
Keep a spray bottle of 3% (straight) to disinfect the interior of the refrigerator and kids’ school lunch boxes.
In the Dishwasher: Add 2 oz. of 3% hydrogen peroxide to your regular washing formula.
Fill a spray bottle with a 50/50 mixture of 3% hydrogen peroxide and water and keep it in every bathroom to disinfect without harming your septic system like bleach or most other disinfectants will. After rinsing off your wooden cutting board, pour or spray hydrogen peroxide (and then vinegar) on it to kill salmonella and other bacteria.
I use peroxide to clean my mirrors with, there is no smearing.
Combination of vinegar and hydrogen peroxidemake a cheap, effective and non-toxic disinfectant agent and is said to be more effective at killing pathogens than bleach.  As it is non-toxic, you can use it to disinfect fruits and vegetables, as well as pet toys, equipment and cages.  In tests run at Virginia Polytechnic Institute and State University, pairing Vinegar and Hydrogen Peroxide mists, kills virtually all Salmonella, Shigella, or E. coli bacteria on heavily contaminated food and surfaces.
Directions:
You need TWO spray bottles. DO NOT MIX the solutions together.  Put straight vinegar in one and straight hydrogen peroxide in the other spray bottle.  NOTE: Light destroys peroxide rather quickly. It’s best to leave it in its original bottle and screw in a spray head. DO NOT DILUTE THEM.
Remember for any sanitizer to work properly, the surface has to be clean before you use it.
When you want to sanitize a surface (vegetables, cutting board, counters, sink, cages, toys. toilets, floors, etc.), spray one (it doesn’t matter which one you use first) on the surface, then you spray on the other.  When they mix, for a brief time the chemical action of the two make a very powerful sanitizer.  You can rinse off the surface afterwards, if you want, but the result is non-toxic.
Fortunately it is cheap. BTW, we use it in the bathroom to sanitize the counters, toilets, floors, etc.

Sanitizing Drinking Water

Mold:
Clean with hydrogen peroxide when your house becomes a biohazard after its invaded by toxic mold, such as those with water damage.
Humidifiers/Steamers:
Use 1 pint 3% hydrogen peroxide to 1 gallon of water.
Laundry / Stain Removing:
Stain Remover:
3% Hydrogen Peroxide is the best stain lifter if used fairly soon – although blood stains as old as 2 days have been successfully lifted with Hydrogen Peroxide. Although it will bleach or discolor many fabrics. If a little peroxide is poured onto the stain it will bubble up in the area of the blood, due to a reaction with catalase. After a few minutes the excess liquid can be wiped up with a cloth or paper towel and the stain will be gone.
3% H2O2 must be applied to clothing before blood stains can be accidentally “set” with heated water. Cold water and soap are then used to remove the peroxide treated blood.
Washing/Laundry:
You can also add a cup of hydrogen peroxide instead of bleach to a load of whites in your laundry to whiten them. If there is blood on clothing, pour directly on the soiled spot. Let it sit for a minute, then rub it and rinse with cold water. Repeat if necessary.
Peroxide is a perfect alternate solution to keep those clothes white. Also, when chlorinating clothes, they tend to wear out faster – peroxide won’t do that.


http://docakilah.wordpress.com/2011/12/09/the-benefits-of-hydrogen-peroxide-and-its-many-uses/