Baked Doughnuts

I love sweets. Wait is it obvious?
I am sure you know by now that I love anything sweet. Anything. Anything.
I love the obvious sweets – Candy, Ice Cream, Cakes – but I also love
the more non-obvious sweets. Like fruit! Fruit has a natural sweetness
that I crave. They say that fruit is natures dessert. When I heard
this I knew why I liked fruit so much :).
Ok, now back to the guilty, indulging kinds
of sweets. Not that fruit isn’t indulging, it’s just not the same.
You know what I mean...
I’m taking about the
kinds that make you so happy while your eating. You’re smiling when
you’re eating them. And then after you eat them you feel that little
bit of guilt. That guilt where the healthy side of you is saying, “Why
did I eat that!” But your indulging side is saying, “Thank you!” I
listen to both sides pretty equally. That’s how I get to live a fun and
healthy lifestyle.
A healthy and fun lifestyle is being able
to say no and yes. Does that make sense? It does to me, but I know I
say things sometimes and people have no clue what I’m saying. So let me
explain. You can’t just always say yes to every food. You have to
control yourself and say no. If you didn’t than that would be unhealthy
for you. But you can’t say no all the time. You need to let yourself
indulge sometimes. Enjoy life! Enjoy food! Ok does that make sense
now? I think I might have confused you. Ah, its ok… let’s continue!
A doughnut (or donut – however you want to
spell it) is one of those indulging foods. Very very very indulging.
You definitely can’t have a donut for breakfast every day and be
healthy. Eating a donut in the morning is not the healthiest way to
start your day. I mean come on. Who ever thought of frying dough,
topping it with sugar, and serving it for breakfast? So random
right! You think it would be more of a dessert item. Who ever invented
donuts probably invented it to be a dessert. But someone in America
thought, “This would be an amazing breakfast!” and then it happened – a
dessert item for breakfast. Don’t quote me on this history, I’m just
talking :).


I have treated myself to a fair amount of
donuts in my day. I ate them much more when I was younger, but I still
have one here and there. With my love for sweets it’s natural for me to
want to eat sweets for breakfast. And I never said I opposed to that
dessert for breakfast idea… I actually love that idea. Just can’t do it often. Even though I wish I could!
One thing that makes donuts not so good for
you is that they are fried. But this is what makes them incredibly
delicious. So I thought… can I make a baked donut that is just as
good? I searched the internet and found out that people have been doing
this a lot lately. When I found a recipe that I liked I got out my
donut cutter (Yes I bought one from
Williams and Sonoma because I couldn’t resist one day) and made baked donuts!
What a revelation! They were doughy and soft and really flavorful. And much healthier than fried donuts! However, don’t think that these taste healthy. They are just healthier.
They are just as indulging as normal donuts and definitely give you
that sweet fix. Make them for breakfast, a snack, or dessert, and you
won’t be missing those fried donuts anymore!
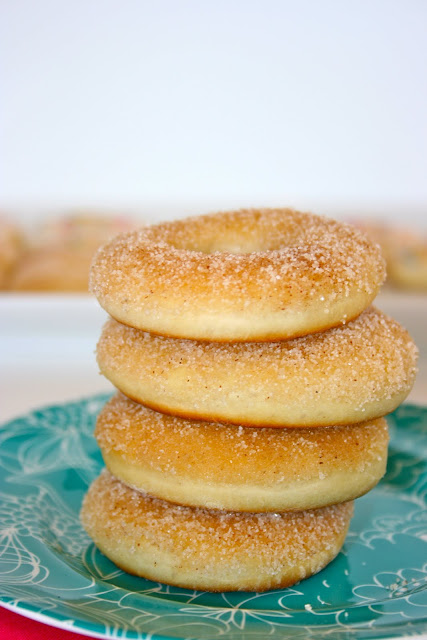
I made 2 variations of these donuts – one
that is topped with cinnamon-sugar, and the other that is dipped in a
vanilla glaze. Each way was equally delicious. I couldn’t decide which
one I liked more. You can top your donuts whichever way you prefer.
Or you can do half and half like I did. Either way, I know you will
enjoy these yummy baked donuts!
Baked Doughnuts
For Printable Recipe, Click
here!
Makes: About 15 doughnuts (& donut holes)
For the Dough
3/4 cups Warm Milk
1 packet Active Dry Yeast
1 tbsp. Unsalted Butter
1/3 cup Sugar
1 Egg
2 ½ cup All Purpose Flour
Pinch of Nutmeg
½ tsp. Salt
For the Glaze
* Enough to glaze all the doughnuts
¼ cup Milk
1 tsp. Pure Vanilla Extract
2 cups Confectioners Sugar
For the Cinnamon Sugar Topping
*Enough to cover all of the doughnuts
½ cup Unsalted Butter
1 cup Sugar
1 tbsp. Cinnamon
To make the dough, place ¼ cups of the warm milk in the bowl of a stand mixer. Sprinkle the yeast over the milk. Let sit for 5 minutes.
In a small bowl, combine the remaining ½
cup of milk with the sugar and butter. Add it to the yeast mixture.
Stir to combine. Add the egg and stir until incorporated. Add the
flour, nutmeg, and salt and stir until the dough starts to form. Change
to the dough hook and knead for until the dough starts to become
smooth. If the dough is too sticky, slowly add more flour until it is
no longer sticky.
Transfer to the dough to a lightly floured
surface and knead for 5 minutes until the dough is smooth and elastic
and has formed a ball. Place the dough ball in a large lightly greased
bowl, and cover with plastic wrap. Let sit in a warm place for about 1
hour, until doubled in size.
Once the dough has risen, roll it out on a
lightly floured surface until ½ thick. Using a doughnut cutter (if you
don’t have a doughnut cutter, you can use 2 biscuit cutters – 1 that is
about 3 inches, and the other that is about 2 inches for the inner
circle) cut out the doughnuts until you have no dough left. If desired
you can gather up the scraps into a ball and roll it out and cut out
more doughnuts. I prefer not too because I feel the dough becomes too
tough.
Place the doughnuts on a baking sheet lined
with a silicone mat or parchment paper, about 2 inches apart. Cover
with a clean towel and let sit for about 45 minutes.
Preheat the oven 375 degrees F.
Place the baking sheets in the oven and
bake for 7 minutes, until lightly golden brown. Be careful to not
overbake these. You want them to be light and doughy inside. Let the
doughnuts cool for about 5 minutes until ready to top with either the
glaze or cinnamon sugar topping
While the doughnuts are cooling make the
glaze and/or cinnamon sugar glaze. Each recipe makes enough to cover
all the doughnuts. I made a half recipe of each and topped half of the
doughnuts with each topping. Or you can choose to just do one of
topping for all the doughnuts.
To make the glaze, combine the milk
and the vanilla in a small saucepan. Heat over low heat until just
warmed. Slowly add in the confectioners sugar and whisk until the
mixture is smooth. Remove the glaze from the heat and place over a bowl
of warm water.
To glaze the doughnuts, dip them halfway
into the glaze and place on a draining/cooling rack set over a baking
sheet. Sprinkle with sprinkles if desired. Let set for about 10
minutes.
To make the cinnamon sugar topping,
melt the butter in a saucepan or a microwave, and place in a small
bowl. Combine the sugar and cinnamon in a medium sized bowl.
To top the doughnuts with cinnamon sugar,
dip the halfway into the melted butter. Then dip them into the
cinnamon-sugar mixture. Set on a draining/cooling rack to set, about 5
minutes.
Serve and enjoy :)!


 I love sweets. Wait is it obvious?


